

Mastering Basic Git Commands-A beginner's friendly guide
push and pull like a pro!


Table of contents

No headings in the article.
Hello, I was once like you. I learnt the basics of html and css, built a small project when my tutor suggested that I push to github. she explained everything she could about git and github but it wasn't clicking. I just nodded with an assenting smile and took off. Deep down, I knew I did not understand a word of what she was saying. Later that evening, I began to comb the internet in search of answers. Everything was written using technical jargons and for a newbie like me, this was hell. If my story is similar to yours, stay with me. I'll hold your hand and walk you through git and basic github commands. There are plenty of tutorials out there already, but most of them simply tell you to copy/paste specific things to do one-off tasks. Anyone with a keyboard can copy/paste; to really understand how git works and what it can do for you, you need deeper understanding. They also tend to throw vocabulary at you without explaining what the words really mean. This guide aims to give you a workable understanding of the basic phrases and commands you’ll use frequently. you may think it’s impossible to learn such a powerful and complex tool in just one sitting, but I encourage you to sit back while I show you exactly how it works.
First and foremost, Github is not Git. They are simply not the same thing. Git is an open-source, version control tool created in 2005 by developers working on the Linux operating system; GitHub is a company founded in 2008 that makes tools which integrate with git. You do not need GitHub to use git, but you cannot use GitHub without using git. There are many other alternatives to GitHub, such as GitLab, BitBucket, and “host-your-own” solutions such as gogs and gittea. All of these are referred to in git-speak as “remotes”, and all are completely optional. You do not need to use a remote to use git, but it will make sharing your code with others easier. Git makes it easier to track changes to files. For instance, when you edit a file, git can help you determine exactly what changed, who changed it, and why. It’s useful for coordinating work among many people on a project, and for tracking progress over time.
Ready now? let's dive in.
step 1: Install Git and create a GitHub account.
The first two things you'll want to do are install git and create a free GitHub account. Follow the instructions here to install git (if it's not already installed) Note that for this tutorial we will be using git on the command line only. While there are some great git GUIs (graphical user interfaces), I think it's easier to learn git using git-specific commands first and then to try out a git GUI once you're more comfortable with the command. A note: 95% of other online git resources and discussions will also be for the command-line interface. Once you've done that, create a GitHub account here.
Step 2: Create a local git repository.
When creating a new project on your computer using git, you'll first create a new repository, AKA repo for short To use git, we'll be using the terminal. If you don't have much experience with the terminal and basic commands, check out this tutorial To begin, open up a terminal and move to where you want to place the project on your local machine using the cd (change directory) command. For example, you'd do something like this:
sph@Ifenkilis-MacBook-Pro ~ % cd desktop
sph@Ifenkilis-MacBook-Pro desktop % mkdir myFirstGit
sph@Ifenkilis-MacBook-Pro desktop % cd myFirstGit
sph@Ifenkilis-MacBook-Pro myFirstGit %
once you have done this, the next step is initialize the git repository. This is just a big word for saying that we will create a new repository. To initialize a git repository in the root of the folder, run the git init command as seen below
sph@Ifenkilis-MacBook-Pro myFirstGit % git init
Initialized empty Git repository in /Users/sph/Desktop/myFirstGit/.git/
sph@Ifenkilis-MacBook-Pro myFirstGit %
Step 3: Add a new file to the initialized repository.
Go ahead and add a new file to myFirstGit, using any text editor you like (I'm using vscode) or running a touch command. touch newfile.txt just creates and saves a blank file named newfile.txt.
Once you've added or modified files in a folder containing a git repository, git will notice that the file exists inside the repository. However, git won't track the file unless you explicitly tell it to track it for you. Git only saves/manages changes to files that it tracks, so we’ll need to send a command to confirm that yes, we want git to track our new file.
sph@Ifenkilis-MacBook-myFirstGit  % touch jennifer.txt
sph@Ifenkilis-MacBook-myFirstGit  %
After creating the new file, you can use the git status command to see which files git knows exist.
sph@Ifenkilis-MacBook-Pro myFirstGit % git status
On branch master

No commits yet

Untracked files:
  (use "git add <file>..." to include in what will be committed)
    jennifer.txt

nothing added to commit but untracked files present (use "git add" to track)
sph@Ifenkilis-MacBook-Pro myFirstGit %
What this basically means is, "Hey, we noticed you created a new file called jennifer.txt, but unless you use the 'git add' command we aren't going to do anything with it." What will I do next? Let me quickly divert your attention a little.
Aside: The staging environment, the commit, and you!
One of the most confusing parts when you're first learning git is the concept of the staging environment and how it relates to a commit. A commit is a record of changes you have made since the last time you made a commit. Essentially, you make changes to your repo (for instance, adding a file or modifying one) and then asking git to put those changes into a commit. Commits make up the essence of your project and allow you to jump to the state of a project at any other commit. So, how do you tell git which files to put into a commit? This is where the staging environment comes in.
As seen in Step 3, when you make changes to your repository, git notices that a file has changed but won't do anything with it (like adding it in a commit). To add a file to a commit, you first need to add it to the staging environment. To do this, you can use the git add command (see Step 4 below). Once you've used the git add command to add all the files you want to the staging environment, you can then tell git to package them into a commit using the git commit command. Note: The staging environment, also called 'staging', is the new preferred term for this, but you can also see it referred to as the 'index'.
Step 4: Add a file to the staging environment
Add a file to the staging environment using the git add command. If you rerun the git status command, you'll see that git has added the file to the staging environment (notice the "Changes to be committed" line).
sph@Ifenkilis-MacBook-Pro myFirstGit % git add jennifer.txt
sph@Ifenkilis-MacBook-Pro myFirstGit % git status
On branch master

No commits yet

Changes to be committed:
  (use "git rm --cached <file>..." to unstage)
    new file:   jennifer.txt
To reiterate, the above file has not yet been added to a commit, but it's about to be.
Step 5: Create a commit
It's time to create your first commit! To create your first commit, Run the command below. git commit -m "put any message about the commit (your choice)" the commit message should be in quotation mark(" ")
sph@Ifenkilis-MacBook-Pro myFirstGit % git commit -m "my first commit message"
[master (root-commit) 838b146] my first commit message
 1 file changed, 0 insertions(+), 0 deletions(-)
 create mode 100644 jennifer.txt
sph@Ifenkilis-MacBook-Pro myFirstGit %
The message at the end of the commit should be something related to what the commit contains - maybe it's a new feature, maybe it's a bug fix, maybe it's just fixing a typographical error. Don't put a message like "fksdorow" or "navbar". That makes the other people who see your commit as a terrible one. Commits live forever in a repository (technically you can delete them if you really need to but it’s messy), so if you leave a clear explanation of your changes, it can be extremely helpful for future programmers (perhaps future you!) who are trying to figure out why some change was made years later.
Step 6: Create a new branch
Now that you've made a new commit, let's try something a little more advanced.
for instance, you want to make a new feature but are worried about making changes to the main project while developing the feature. This is where git branches come in. Branches allow you to move back and forth between 'phases' of a project. Official git docs describe branches this way: ‘A branch in Git is simply a lightweight movable pointer to one of these commits.’ For instance, if you want to add a new page to your website, you can create a new branch just for that page without affecting the main part of the project. Once you're done with the page, you can merge your changes from your branch into the primary branch. When you create a new branch, Git keeps track of which commit your branch 'branched' off of, so it knows the history behind all the files. Let's say you are on the primary branch and want to create a new branch to develop your web page. Here's what you'll do: Run git checkout -b . This command will automatically create a new branch and then 'check you out' on it, meaning git will move you to that branch, off of the primary branch. After running the above command, you can use the git branch command to confirm that your branch was created:
sph@Ifenkilis-MacBook-Pro myFirstGit % git checkout -b stagingbranch
Switched to a new branch 'stagingbranch'
sph@Ifenkilis-MacBook-Pro myFirstGit % git branch
  master
* stagingbranch
sph@Ifenkilis-MacBook-Pro myFirstGit %
Note: The branch name with the asterisk next to it indicates which branch you're on at that given time.
Step 7: Create a new repository on GitHub
If you only want to keep track of your code locally, you don't need to use GitHub. But if you want to work with a team, you can use GitHub to collaboratively modify the project's code.
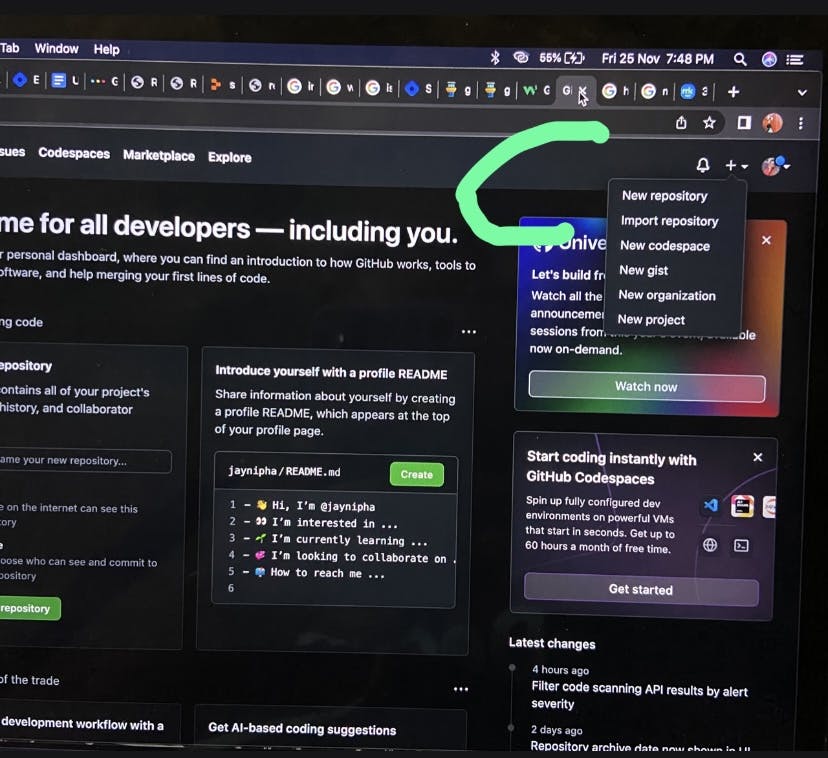
To create a new repository on GitHub, log in and go to the GitHub home page. You can find the “New repository” option under the “+” sign next to your profile picture, in the top right corner of the navbar:
After clicking the button, GitHub will ask you to name your repo and provide a brief description:
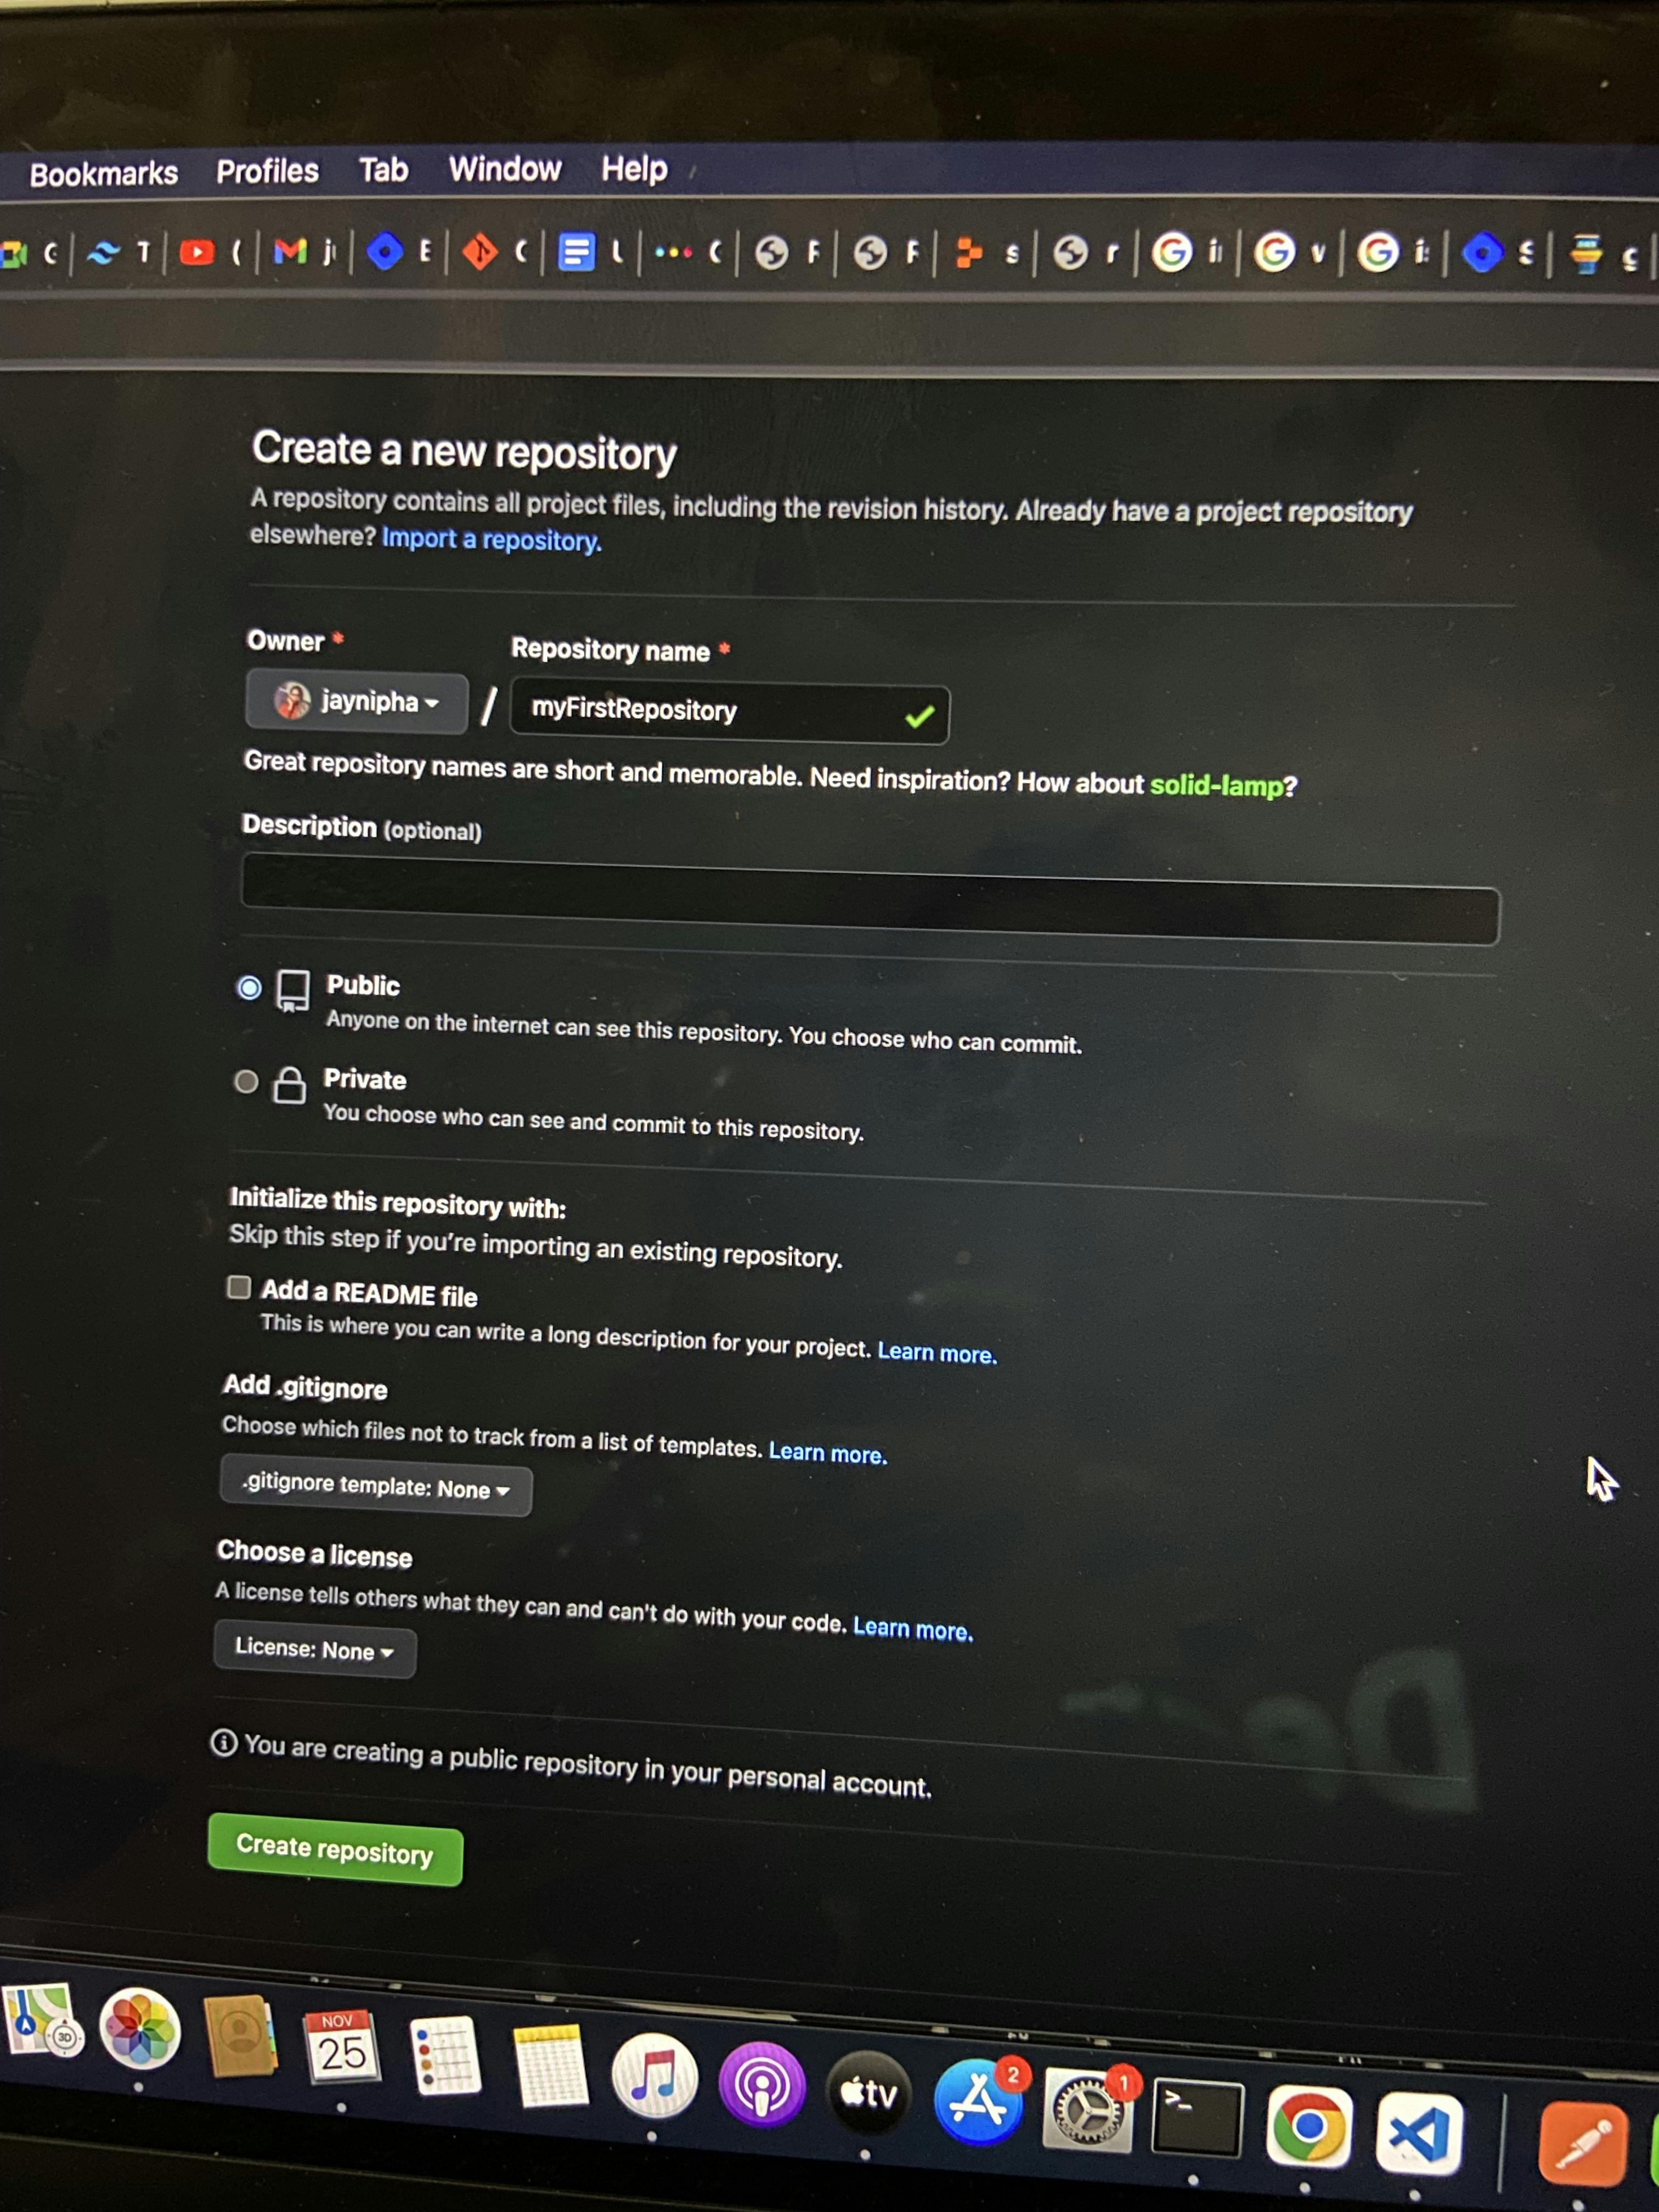
When you're done filling out the information, press the 'Create repository' button to make your new repository. GitHub will ask if you want to create a new repo from scratch or if you want to add a repository you have created locally. In this case, since we've already created a new repo locally, we want to push that onto GitHub so follow the '....or push an existing repository from the command line' section:
sph@Ifenkilis-MacBook-Pro myFirstGit % git remote add origin https://github.com/jaynipha/myFirstRepository.git
sph@Ifenkilis-MacBook-Pro myFirstGit % git push -u origin main
Enumerating objects: 3, done.
Counting objects: 100% (3/3), done.
Writing objects: 100% (3/3), 225 bytes | 225.00 KiB/s, done.
Total 3 (delta 0), reused 0 (delta 0)
To https://github.com/jaynipha/myFirstRepository.git
 * [new branch]      main -> main
Branch 'main' set up to track remote branch 'main' from 'origin'.
sph@Ifenkilis-MacBook-Pro myFirstGit %
N/B:(please change the URL in the first command line to what GitHub lists in this section for you since your GitHub username and repo name are different.)
Step 8: Push a branch to GitHub
Now we'll push the commit in your branch to your new GitHub repository. This allows other people to see the changes you've made. If they're approved by the repository's owner, the changes can then be merged into the primary branch. To push changes onto a new branch on GitHub, you'll want to run git push origin -yourbranchname-
sph@Ifenkilis-MacBook-Pro myFirstGit % git push origin stagingbranch
Total 0 (delta 0), reused 0 (delta 0)
remote:
remote: Create a pull request for 'stagingbranch' on GitHub by visiting:
remote: https://github.com/jaynipha/myFirstRepository/pull/new/stagingbranch
remote:
To https://github.com/jaynipha/myFirstRepository.git
 * [new branch]      stagingbranch -> stagingbranch
sph@Ifenkilis-MacBook-Pro myFirstGit %
GitHub will automatically create the branch for you on the remote repository.
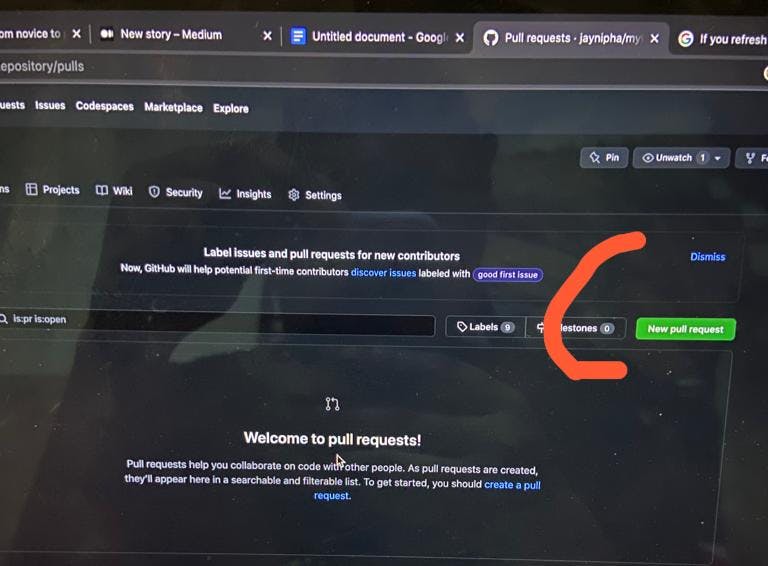
Now, click on this green button below, it's time to create a pull request
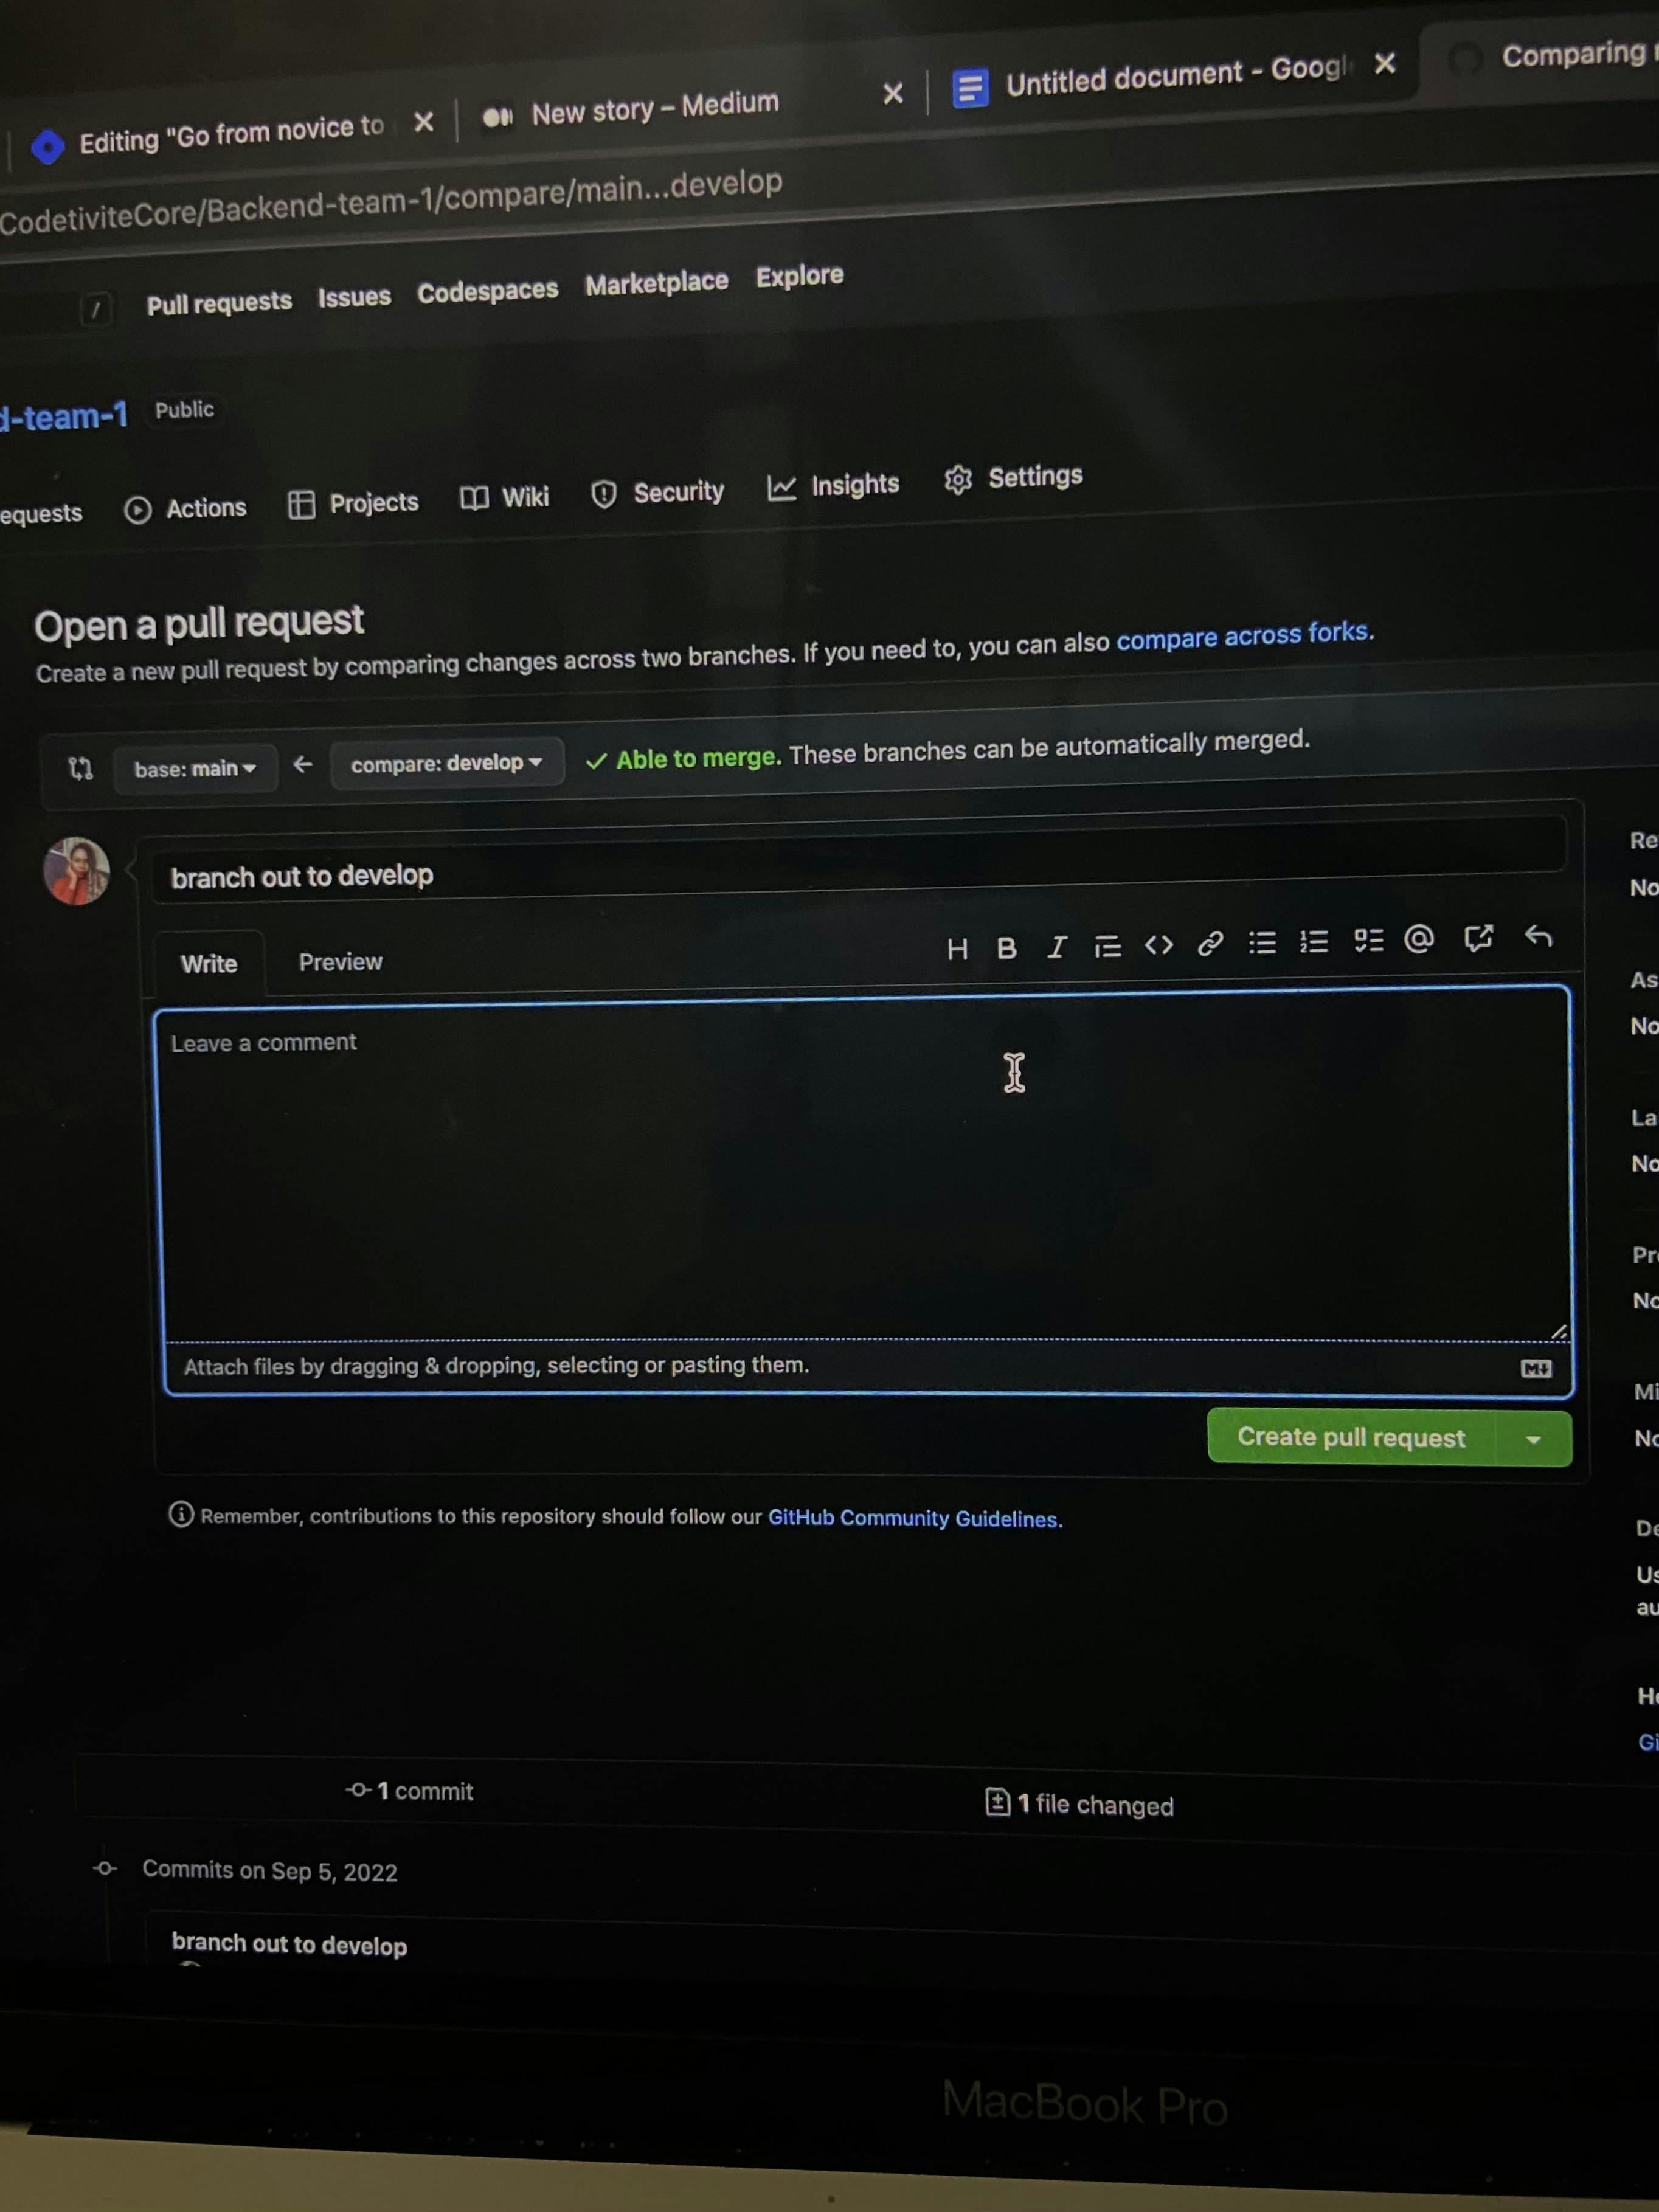
Step 9: Create a pull request(PR) A pull request (or PR) is a way to alert a repository's owner that you want to make some changes to their code. It allows them to review the code and make sure it looks good before putting your changes on the primary branch. This is what the PR page looks like before you've submitted it:
And this is what it looks like once you've submitted the PR request:
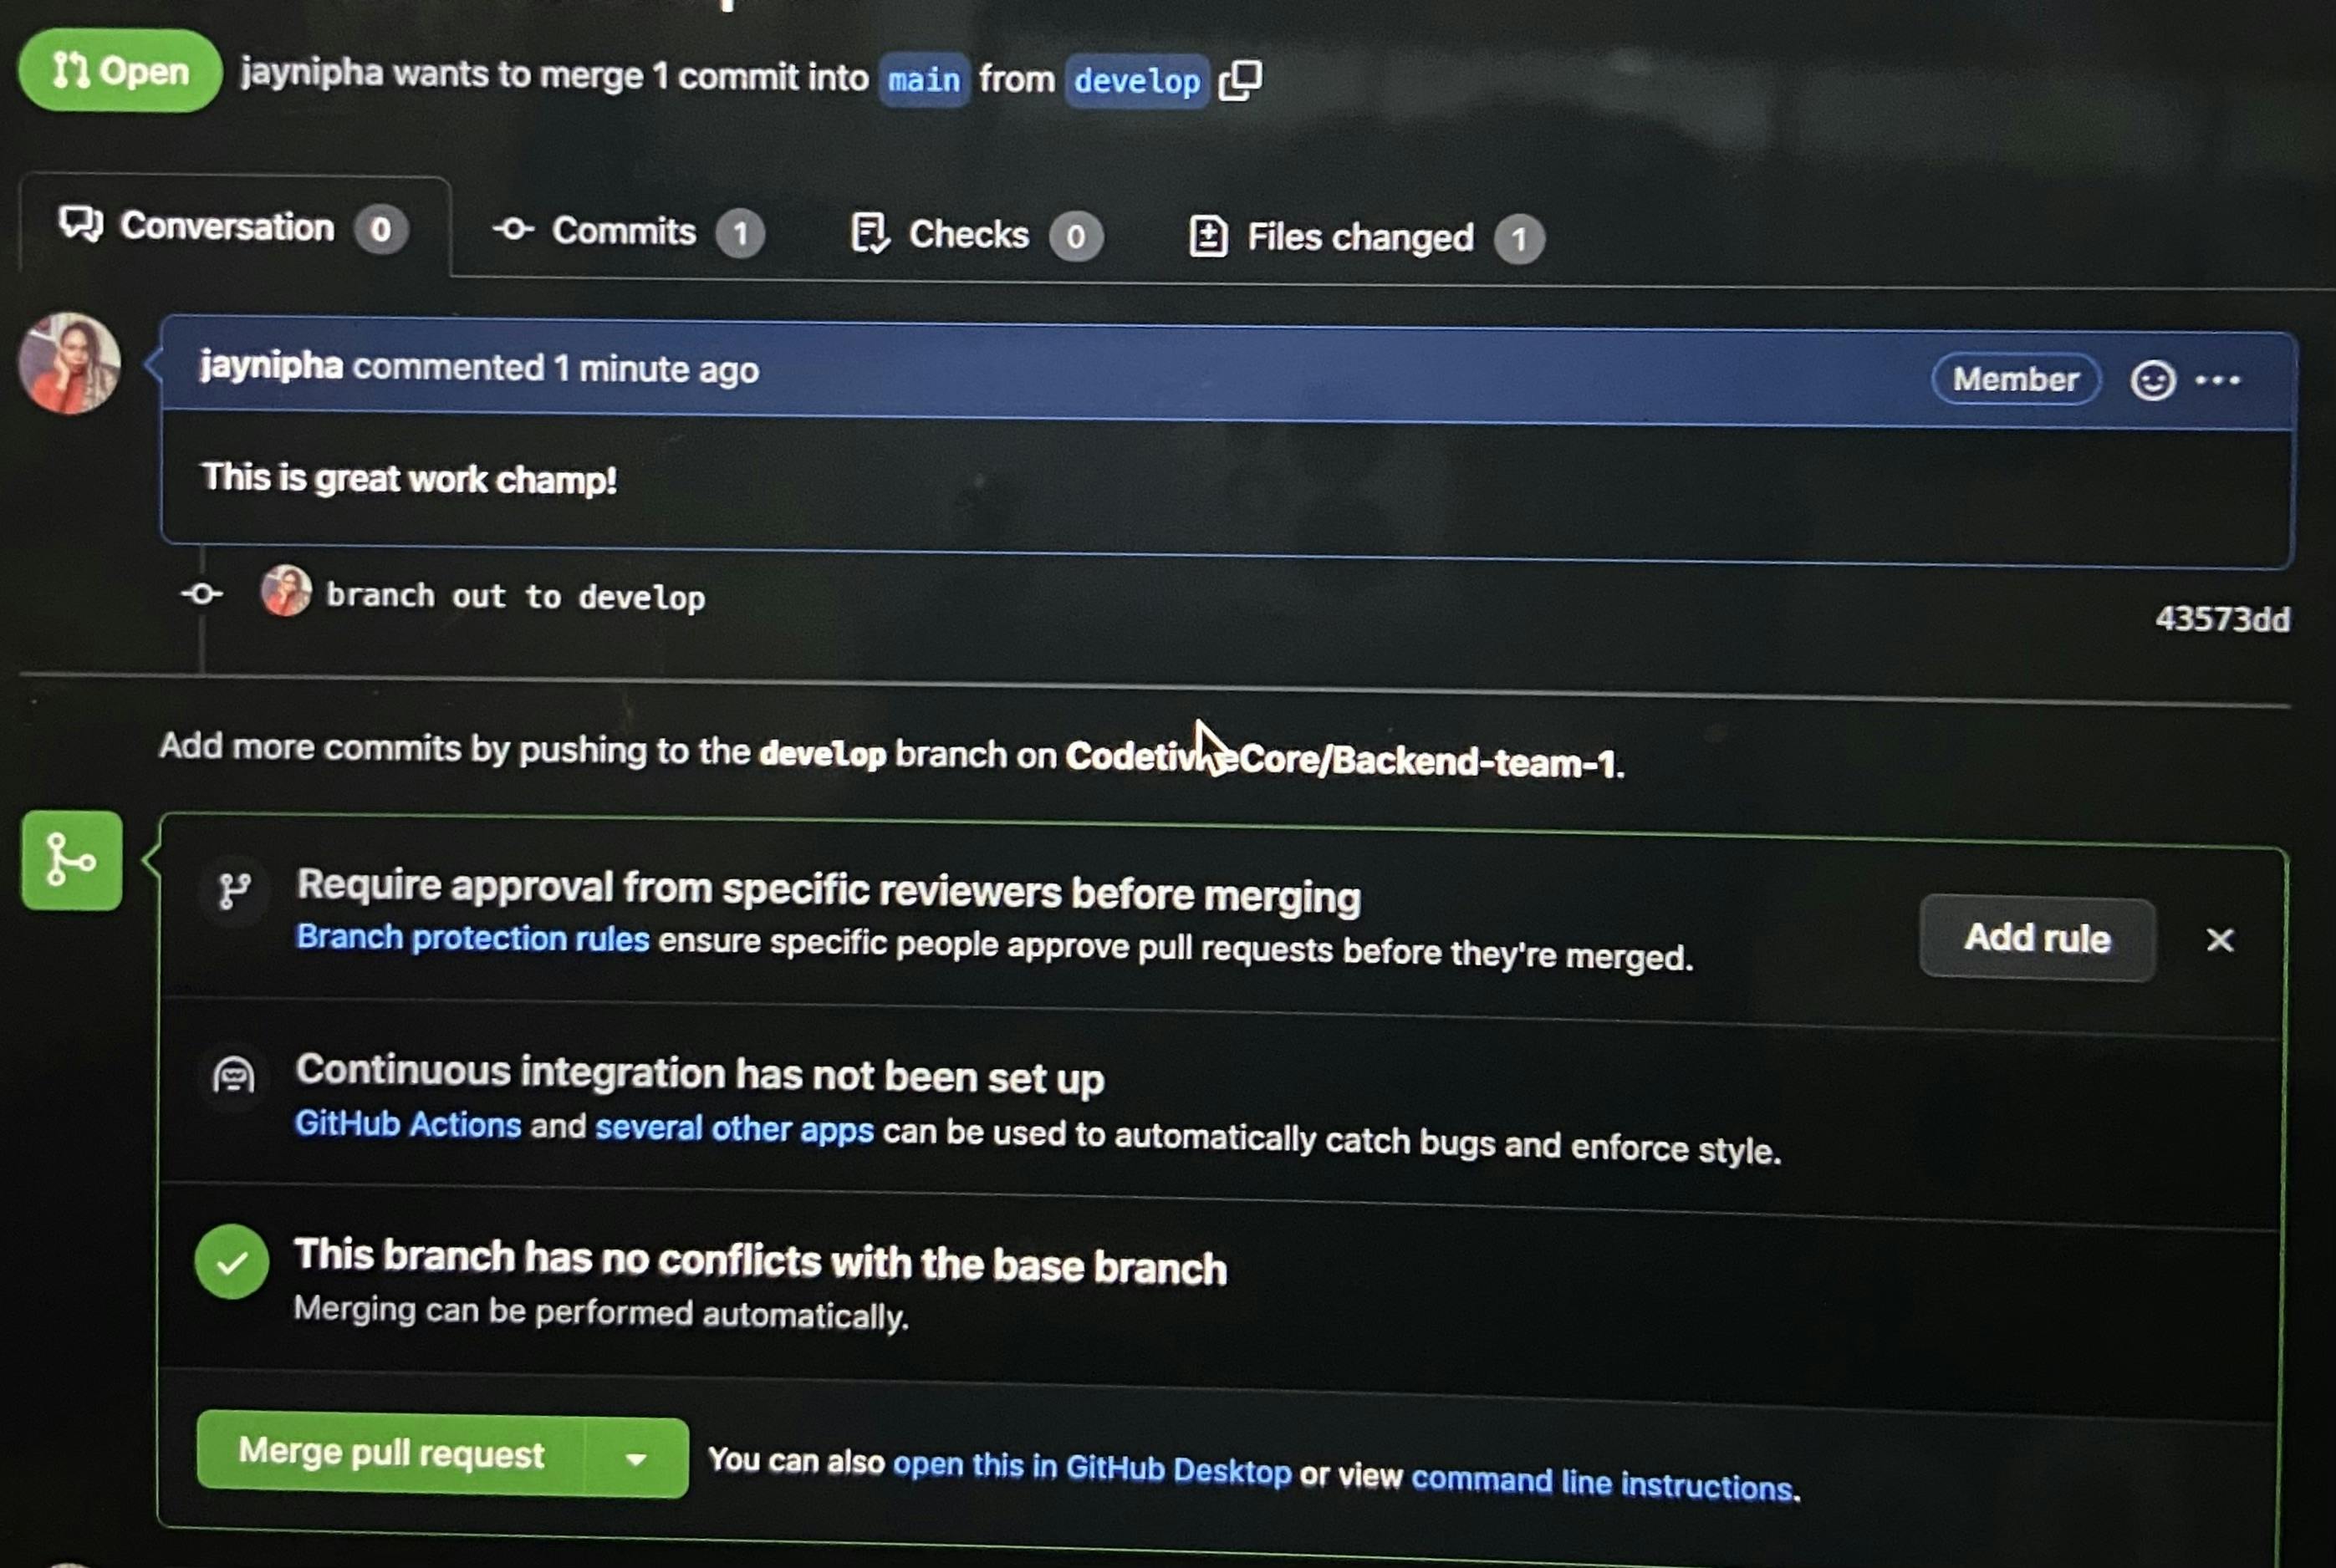
You might see a big green button at the bottom that says 'Merge pull request'. Clicking this means you'll merge your changes into the primary branch..
Sometimes you'll be a co-owner or the sole owner of a repo, in which case you may not need to create a PR to merge your changes. However, it's still a good idea to make one so you can keep a more complete history of your updates and to make sure you always create a new branch when making changes.
Step 10: Merge a PR
Go ahead and click the green 'Merge pull request' button. This will merge your changes into the primary branch.
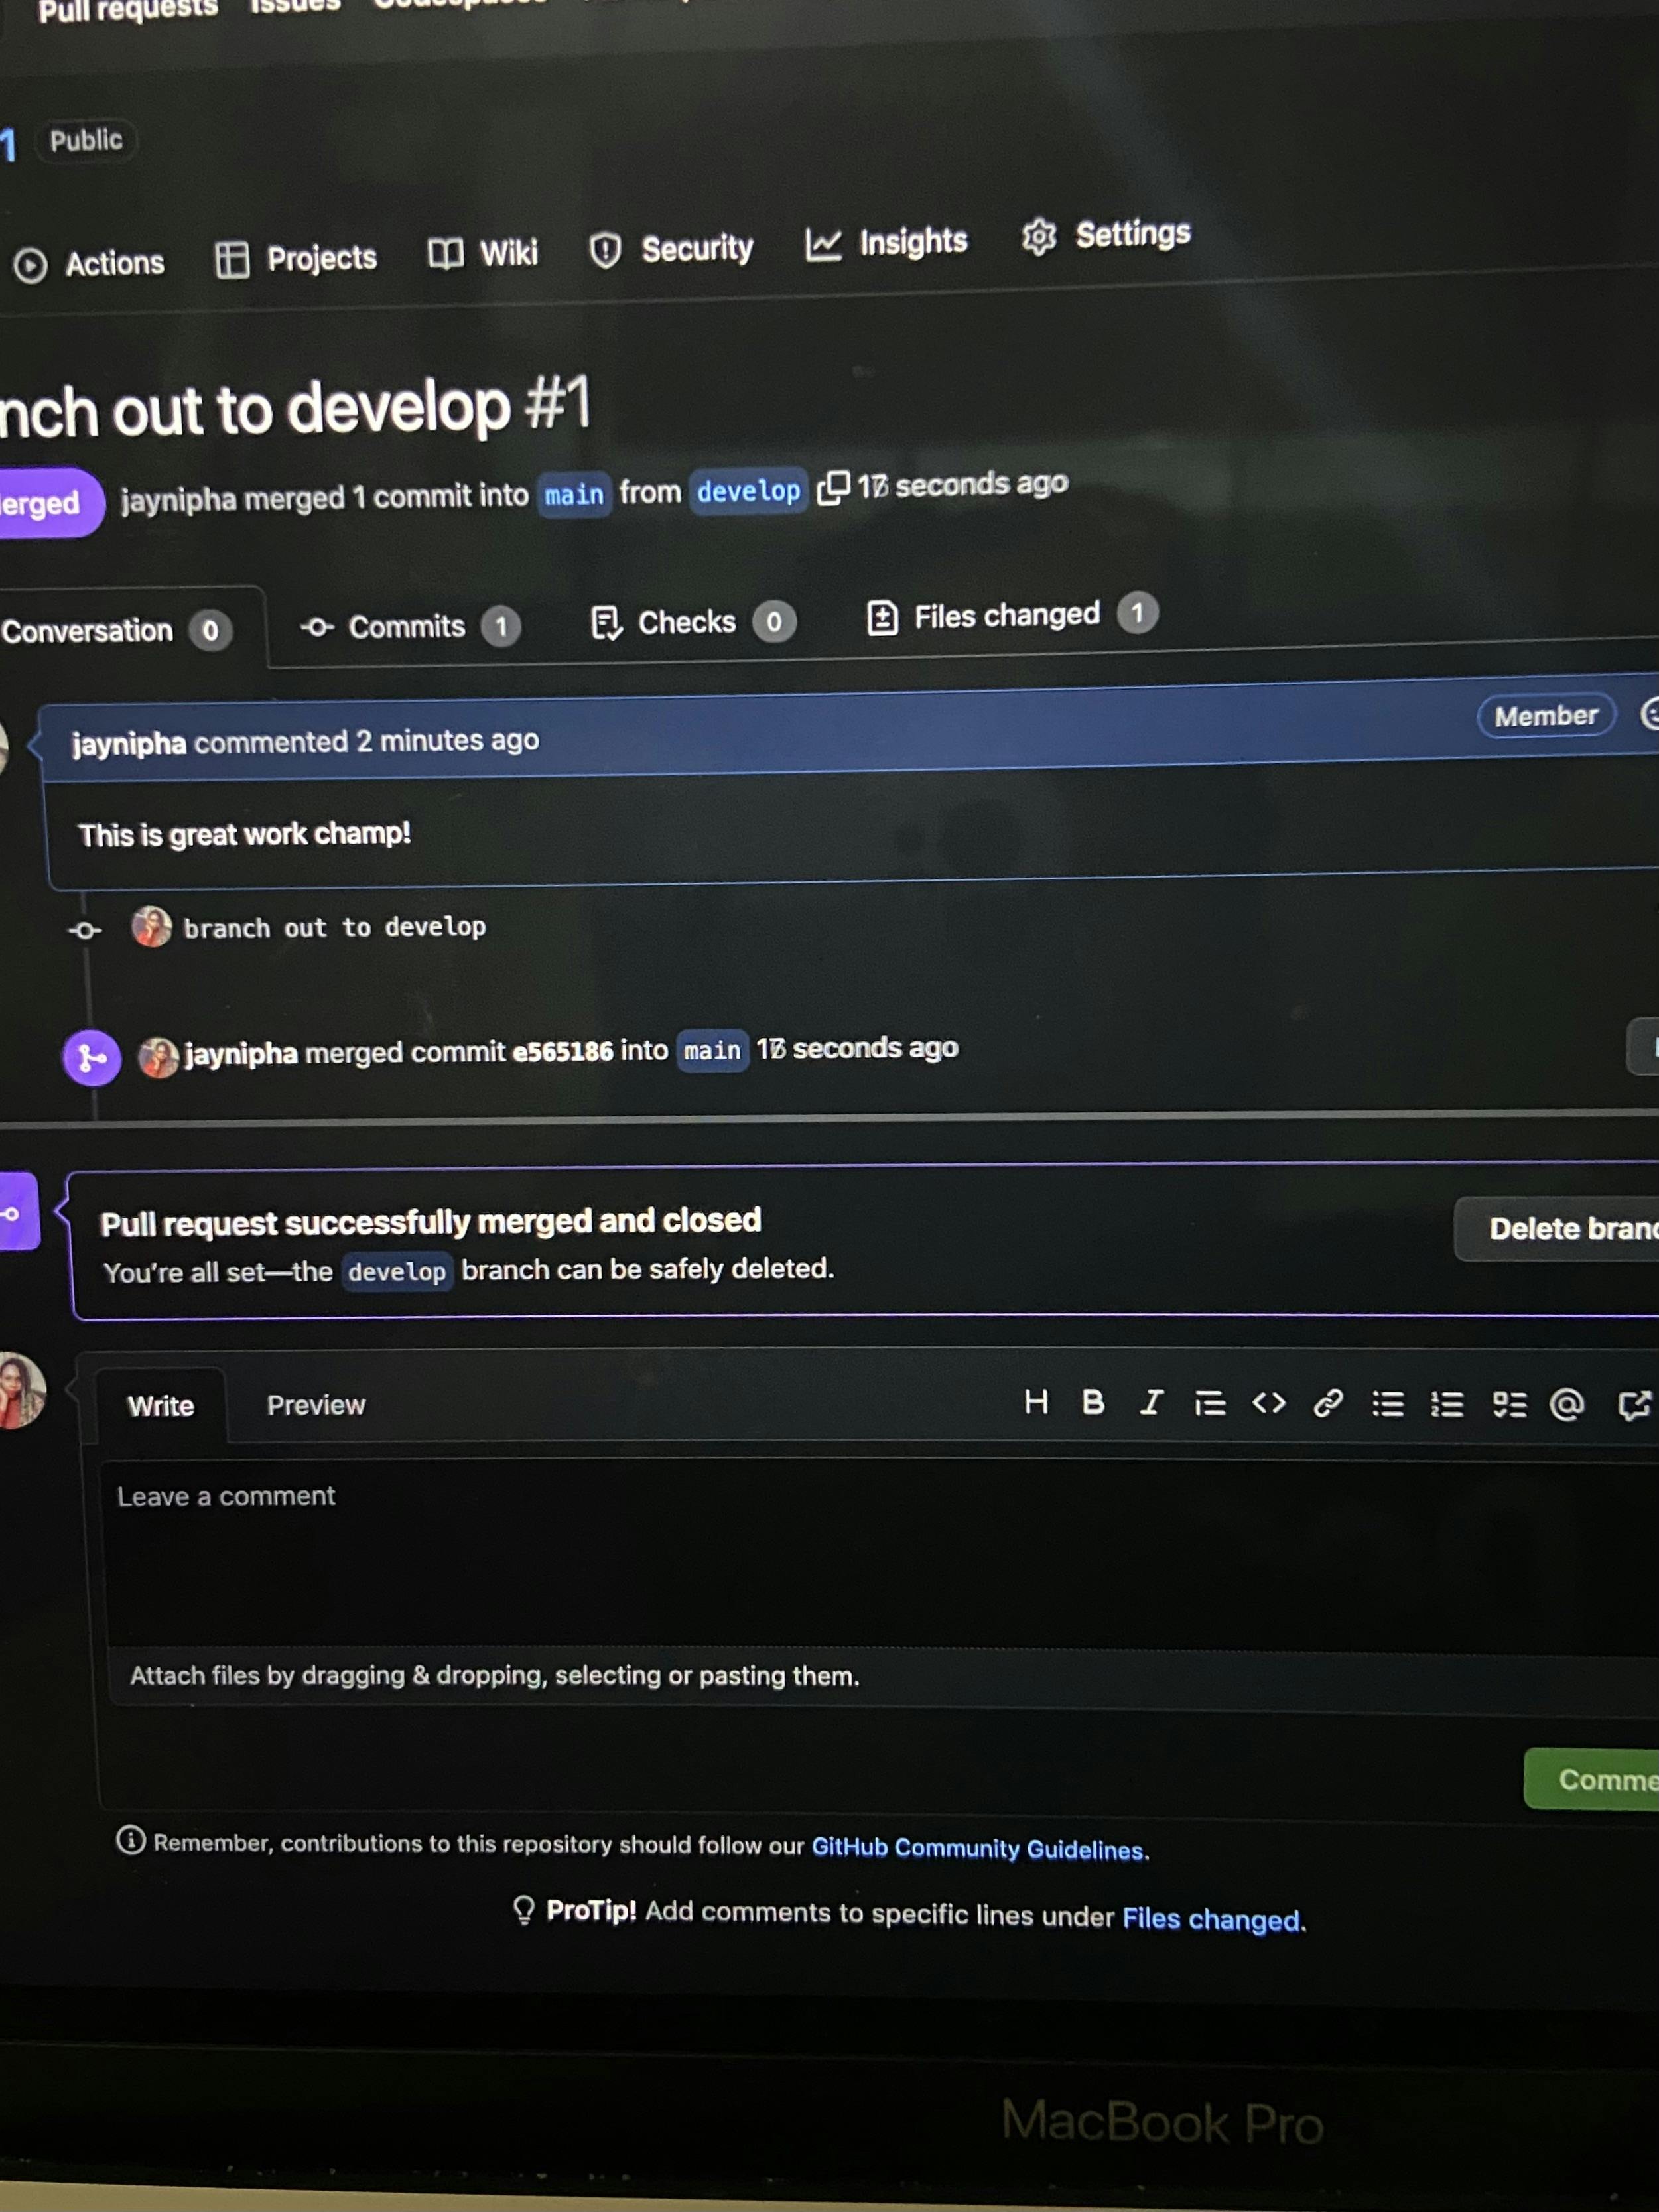
When you're done, I recommend deleting your branch (too many branches can become messy), so hit that grey 'Delete branch' button as well.
Step 11: Get changes on GitHub back to your computer
Right now, the repo on GitHub looks a little different than what you have on your local machine. For example, the commit you made in your branch and merged into the primary branch doesn't exist in the primary branch on your local machine. In order to get the most recent changes that you or others have merged on GitHub, use the git pull origin main command (when working on the primary branch). In most cases, this can be shortened to “git pull”.
And that's how you push and pull to git like a champ!
N/B:A note on branch names
By default, every git repository’s first branch is named master (and is typically used as the primary branch in the project). As part of the tech industry’s general anti-racism work, some groups have begun to use alternate names for the default branch (we are using “primary” in this tutorial, for example). In other documentation and discussions, you may see “master”, or other terms, used to refer to the primary branch. Regardless of the name, just keep in mind that nearly every repository has a primary branch that can be thought of as the official version of the repository. If it’s a website, then the primary branch is the version that users see. If it’s an application, then the primary branch is the version that users download. This isn’t technically necessary (git doesn’t treat any branches differently from other branches), but it’s how git is traditionally used in a project.